
A photo does not always need a dramatic makeover. Often, the original image is fine but slightly soft, poorly lit, noisy, compressed or lacking detail.
The challenge is getting an AI editor to improve those weaknesses without changing the person, expression, clothing or overall character of the photograph.
That is where well-written Gemini AI photo enhancement prompts become useful.
Gemini can edit an uploaded image and make targeted changes through natural-language instructions. Google’s current Gemini image system supports local edits, higher-quality image generation and more detailed instruction following. Google also recommends describing the subject, setting, style and other visual details when prompting.
The important point is that “enhance this photo” is often too broad. A better prompt tells Gemini what is wrong, what improvement is wanted and which parts of the original image should stay unchanged.
Below are 50+ prompts you can copy, modify and try.
How to use Gemini for photo enhancement
If you already have a photograph, the process is straightforward.
On Gemini, upload the image you want to edit and ask it to make the required changes. Google’s current instructions allow users to upload an image and request edits, or continue editing an image that Gemini has already generated. On the web version, Google directs users to Gemini, select the image or upload one, choose Chat, enter the editing prompt and submit it.
For the best results:
- Upload the clearest original version you have.
- State the main problem with the image.
- Tell Gemini what you want improved.
- Mention important details that must remain unchanged.
- Avoid asking for ten unrelated edits in one prompt.
- If the first result is close but not right, refine it conversationally.
50+ Gemini AI Photo Enhancement Prompts
Google’s own prompt guidance recommends adding detail progressively and specifying elements such as subject, setting, style and composition. Its image prompt guide also explicitly supports iterative editing, including changing specific details and upscaling image quality.
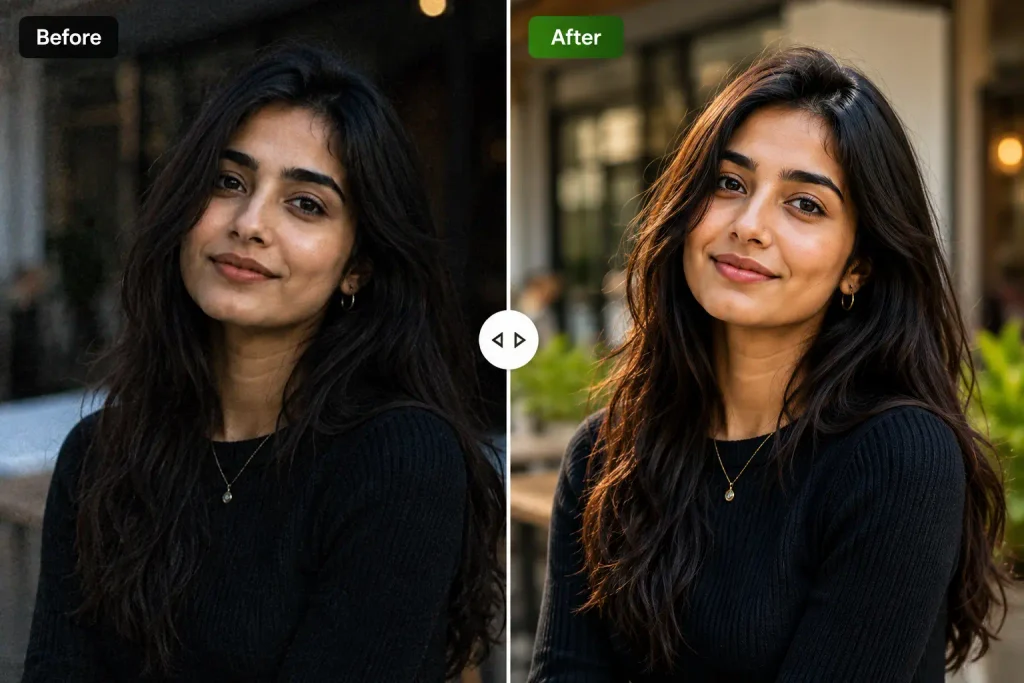
1. General Photo Quality Enhancement Prompts
These are useful when the image is broadly acceptable but needs a cleaner, more polished appearance.
1. Clean Overall Enhancement
2. Natural High-Quality Enhancement
3. Professional Camera Look
4. Social Media-Ready Enhancement
5. Subtle Enhancement
6. High-Resolution Appearance
7. Balanced Enhancement
8. Preserve-Original Prompt
2. Gemini Prompts for Sharpening Blurry Photos
A common mistake is asking an AI editor to “make everything extremely sharp”. That can produce harsh edges and artificial-looking skin.
Instead, specify that you want natural detail recovery.
9. Slightly Blurry Portrait
10. Soft Image
11. Blurry Face
12. Blurry Background
13. Motion-Softened Photo
14. Sharpen Clothing Details
15. Sharpen an Old Digital Photo
3. Gemini Prompts for Portrait Enhancement
Portraits require more restraint than ordinary images. Excessive smoothing can make a real face look synthetic.
16. Natural Portrait Enhancement
17. Professional Headshot Enhancement
18. LinkedIn-Style Portrait
19. Passport-Style Cleanup
20. Natural Skin Texture
21. Face Detail Enhancement
22. Low-Light Portrait
4. Gemini Prompts for Fixing Lighting
Lighting problems are often easier to correct when the prompt explains what kind of correction is wanted.
23. Dark Photo
24. Overexposed Photo
25. Uneven Lighting
26. Face in Shadow
27. Harsh Sunlight
28. Indoor Lighting Correction
29. Golden-Hour Enhancement
5. Gemini Prompts for Colour Correction
Colour correction is different from applying a filter. The goal is to make the photograph more accurate or balanced.
30. Correct White Balance
31. Improve Dull Colours
32. Fix Yellow Colour Cast
33. Fix Blue Colour Cast
34. Improve Skin Tones
35. Film-Like Colour Correction
6. Gemini Prompts for Noise and Grain Reduction
Low-light and heavily compressed photographs can contain distracting digital noise.
36. Low-Light Noise Reduction
37. High-ISO Photo Cleanup
38. Smartphone Noise Reduction
39. Night Photo Cleanup
7. Gemini Prompts for Old and Damaged Photos
Old photographs require a different approach. Restoration should repair visible damage without quietly rewriting history.
40. Restore an Old Photograph
41. Faded Family Photo
42. Damaged Vintage Photo
43. Old Black-and-White Photo
44. Restore and Colourise
45. Family Archive Restoration
8. Gemini Prompts for Social-Media Photos
Social-media enhancement works best when the photograph remains believable after compression.
46. Instagram Portrait Enhancement
47. Instagram Travel Photo
48. Profile Picture Enhancement
49. WhatsApp Profile Photo
50. Social-Media-Ready Natural Edit
9. Extra Prompts for Specific Photo Problems
The following prompts are useful when the image has a particular weakness rather than a general quality problem.
51. Remove Compression Artefacts
52. Improve Hair Detail
53. Improve Eye Clarity
54. Improve Fabric Detail
55. Improve Architectural Detail
56. Clean a Scanned Photograph
57. Improve a Screenshot
58. Product Photo Enhancement
59. Food Photo Enhancement
60. Final Conservative Enhancement
The prompt formula that works better than “enhance this photo”
The most useful distinction is not between a short prompt and a long prompt. It is between a vague request and a controlled request.
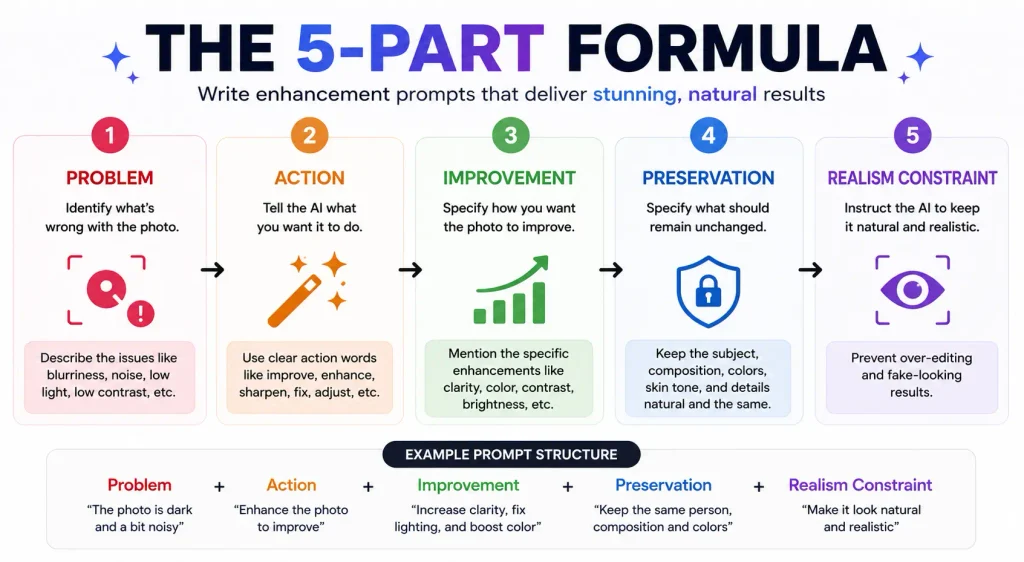
A simple prompt says:
Enhance this photo.
A more useful version says:
Improve the sharpness and exposure of this portrait, reduce digital noise and preserve the person’s facial features, expression, skin texture and original background. Keep the result realistic and avoid excessive smoothing.
The second prompt gives Gemini a job and boundaries.
A practical formula is:
Action + problem + desired improvement + preservation instructions + realism constraint
For example:
Improve this low-light portrait + reduce digital noise + recover facial detail and balanced exposure + preserve identity, expression and skin texture + keep the result natural.
This is more reliable than adding decorative language such as “make it ultra HD, cinematic, stunning, perfect, 8K, masterpiece” when the actual problem is simply poor lighting.
Google’s guidance similarly recommends thinking about the subject, setting, style and composition, while its image-editing guidance supports making targeted changes and refining an image through multiple prompts.
Why preservation instructions matter
AI image editing has two separate goals that are easy to confuse:
Improve the photograph and change the photograph.
They are not the same thing.
Suppose you upload a family portrait and ask:
Make this photo more beautiful.
That leaves Gemini considerable room to interpret the request. The result may alter lighting, skin texture, facial appearance, clothing or even the background.
Instead, say:
Improve exposure, sharpness and colour balance while preserving every person’s facial features, expressions, clothing and the original background.
Now the intended boundary is much clearer.
This becomes particularly important when editing portraits. An enhancement is successful only if the improved photograph still looks like the same photograph.
When a shorter Gemini prompt is actually better
More detail is not automatically better.
If the only problem is that a photo is slightly dark, a long prompt describing the camera, lens, atmosphere, cinematic lighting and composition can distract from the actual task.
Try:
Brighten this photo naturally and recover shadow detail while preserving the original colours and composition.
That is enough.
Use a longer prompt when there are multiple constraints. For example, if a portrait is dark, noisy and slightly soft, explain all three problems and tell Gemini what must not change.
A useful rule is:
One problem → short prompt.
Several problems → structured prompt.
Identity-sensitive edit → add preservation instructions.
Common mistakes when using Gemini photo enhancement prompts
Asking for “maximum quality”
Terms such as “maximum quality” or “make it perfect” do not identify what needs fixing.
If the photograph is noisy, say so. If it is dark, explain that. If the face is soft, ask for controlled clarity.
Over-sharpening
Sharpness can make an image look better up to a point. Beyond that, edges can become harsh and skin can lose its natural appearance.
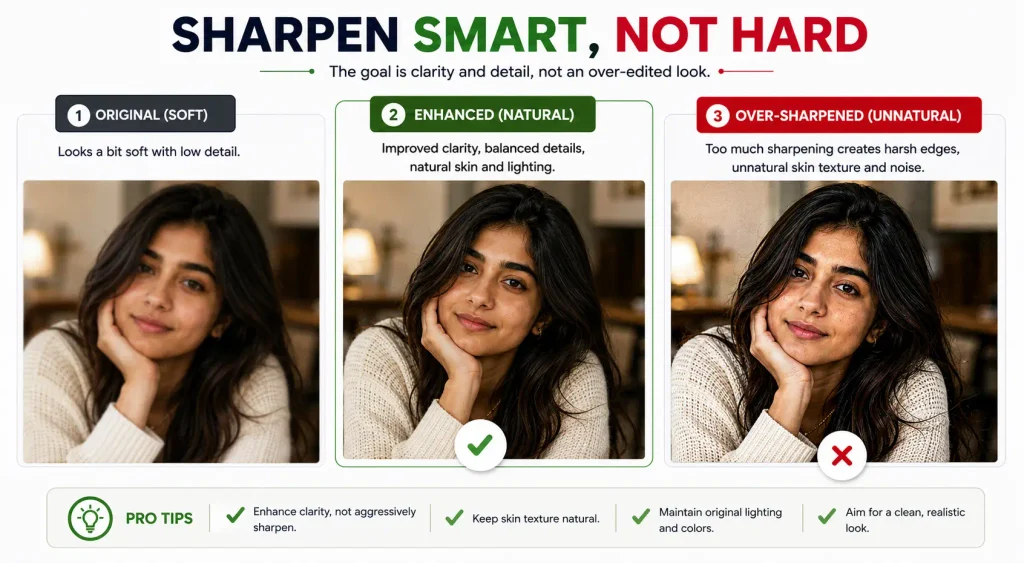
Ask for natural sharpness or subtle detail recovery rather than extreme sharpening.
Removing all skin texture
A portrait without pores, fine lines or natural texture can quickly start looking synthetic.
If realism matters, explicitly ask Gemini to preserve natural skin texture.
Changing things that were never broken
If the background, clothing and facial features are already correct, there is little reason to ask the model to reinterpret them.
Tell it what to leave alone.
Combining enhancement with too many creative edits
“Enhance the photo, change the outfit, replace the background, make it cinematic, add rain and change the lighting” is no longer a simple enhancement request.
Break the job into stages when precision matters.
A better two-step workflow for difficult photos
For challenging images, it can be useful to separate technical correction from creative editing.
Step 1: Fix the photograph
Use a prompt such as:
Improve exposure, clarity and noise reduction while preserving the original subject, face, clothing and background.
Step 2: Make the creative change
Then ask:
Keep the enhanced photograph unchanged, but replace the background with a softly blurred evening city street. Match the lighting on the subject to the new environment.
This approach gives you more control because each prompt has a clear purpose.
Gemini’s image tools are designed for conversational iteration, so users can continue refining an image instead of attempting to describe every possible change in the first instruction.
Gemini enhancement vs upscaling: they are not identical
These terms are often used interchangeably, but they describe different goals.
Enhancement is about improving the visual qualities of an existing image: exposure, colour, noise, clarity, contrast and visible detail.
Upscaling increases the image’s output dimensions or resolution.
A larger image is not automatically a better image. If a small photograph contains very little original detail, simply making it larger cannot magically recover everything that was lost.
For that reason, think about the actual problem first.
If the image is noisy, ask for noise reduction.
If it is dark, correct the exposure.
If it is slightly soft, request controlled sharpening.
If the image is genuinely too small for its intended use, then consider an upscaling step as well.
The simplest prompt template to save
If you regularly use Gemini for photo editing, save this template:
Enhance this photo by [specific improvement]. Improve [second issue if needed]. Preserve [person/subject/background/clothing/composition]. Keep [skin texture/colours/details] natural. Do not [specific unwanted change].
For example:
Enhance this portrait by improving sharpness and exposure. Reduce low-light noise. Preserve the person’s identity, facial features, expression, clothing and background. Keep natural skin texture and realistic colours. Do not apply a beauty filter or change the person’s appearance.
That template can be adapted to almost any photograph.
The real trick is knowing what not to change
The strongest Gemini AI photo enhancement prompts are not necessarily the most elaborate ones. They are the ones that make a clear distinction between correction and reinterpretation.
If an old photograph needs restoration, repair it. If a portrait needs better exposure, fix the lighting. If a smartphone image is noisy, reduce the noise.
Do not ask an image model to redesign a photograph when the real goal is simply to make the existing photograph cleaner.
That distinction matters because good enhancement should become almost invisible. The viewer should notice that the image looks clearer, better balanced and easier to read—not wonder why the person’s face suddenly looks different.
Gemini’s current image models support both generation and editing, including targeted local changes and iterative refinement. For users, that makes prompting less about finding one “magic” sentence and more about giving the model a precise editing brief.
Start with the actual weakness in the image. Tell Gemini what improvement you want. Then protect the details that matter.
That is usually a better path to a convincing photograph than simply asking AI to make it “better.”