
A good AI image enhancer does more than make a picture bigger. The better tools can sharpen soft details, improve clarity and increase resolution—often in a few clicks. For many users, though, there is another requirement that matters just as much: being able to use the tool without creating yet another account.
A blurry photo does not always need Photoshop.
Sometimes the problem is simple. The image is too small. Details look soft after compression. An old photo has lost clarity. A social media image needs a cleaner, sharper version before it can be posted again.
AI image enhancers are designed for these situations. They analyse an existing image and attempt to improve aspects such as resolution, sharpness, detail and overall clarity.
But not every image enhancer is equally convenient.
Some require registration before you can test anything. Others hide downloads behind a subscription. Some are excellent at enlarging an image but less useful when the original is blurry. And a few try to “restore” missing details so aggressively that the final result no longer looks entirely like the original.
That distinction matters.
The best image enhancer is not necessarily the one with the longest feature list. For most people, it is the one that solves the specific problem in front of them without adding unnecessary friction.
For this guide, no-signup access was given significant weight. Tools that let you upload, enhance and test an image immediately are ranked ahead of more complicated alternatives when the quality and use case are comparable.
Quick answer: Which is the best image enhancer tool?
If you want a straightforward answer, Krea is one of the strongest options for quick AI image enhancement without requiring an account. Its enhancer can improve clarity and upscale images, and Krea explicitly states that its basic image enhancer can be used without signing up.
Upscale.media is another excellent option for users who want a simple upload-and-enhance workflow without registration. Its image enhancement tools focus on sharpening and enlarging images with minimal manual setup.
Cutout.Pro is a strong choice if you want image enhancement alongside a wider collection of AI image tools. Its enhancer is designed to sharpen and upscale photos directly in the browser.
PicWish is particularly useful for everyday images, portraits, product photos and general photo enhancement. It combines enhancement and upscaling tools in a relatively simple workflow.
For users who need a broader editing environment, Picsart offers AI enhancement as part of its larger creative toolkit, although its dedicated AI Enhance feature is currently described by Picsart as a premium feature.
Best image enhancer tools at a glance
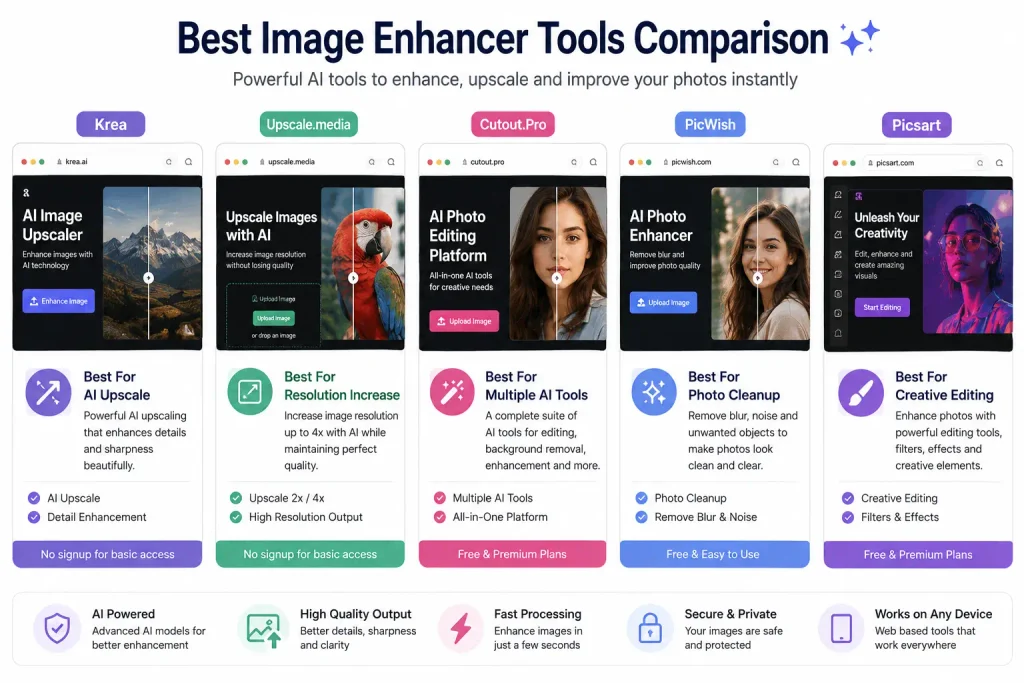
| Tool | Signup Required to Start? | Best For | Main Strength |
|---|---|---|---|
| Krea | No for basic enhancer | Overall AI enhancement | Fast enhancement and upscaling |
| Upscale.media | No for basic use | Quick upscaling | Simple, no-registration workflow |
| Cutout.Pro | Can be tested directly | General AI image enhancement | Enhancement plus other AI image tools |
| PicWish | Limited free online access | Everyday photos and product images | Easy enhancement and upscaling |
| Picsart | Premium features may require subscription | Social media editing | Large creative editing ecosystem |
Signup policies, free credits and download limits can change, so it is worth checking the tool directly before building a workflow around a particular free tier.
1. Krea: Best overall image enhancer without signup
Krea is one of the easiest tools to recommend for this particular article because it addresses the problem directly: upload an image, enhance it and download the result.
More importantly, Krea explicitly states that its AI photo enhancer can be used without creating an account or entering credit-card details for basic use. The company says the tool can sharpen details, improve clarity and upscale images, with a limited number of free enhancements available.
That makes it particularly useful for people who only need to improve one or two images.
Krea is also more than a conventional image upscaler. Its broader platform includes AI image-generation and editing tools, which may appeal to creators who eventually want to move beyond simple enhancement.
What Krea is best for
- Blurry or low-resolution images
- AI-generated images
- Portraits
- Product photos
- Artwork
- Quick resolution enhancement
Why it stands out
The strongest part of Krea’s basic enhancer is its simplicity. There is little setup involved. You do not need to understand sharpening settings or manually adjust complicated parameters before seeing a result.
Krea also emphasises preserving natural details rather than creating an aggressively processed image. That is an important goal because excessive enhancement can introduce artificial textures, especially around hair, skin and fine edges.
How to use Krea’s image enhancer
Step 1: Open the Krea AI Image Enhancer
Go to the Krea enhancer page.
Step 2: Upload your image
Choose the image you want to improve. Krea supports common image formats, including JPEG, PNG and WebP.
Step 3: Start the enhancement
Click the enhance option and allow the AI to process the image.
Step 4: Compare the result
Look closely at important areas such as:
- Faces
- Hair
- Text
- Clothing textures
- Fine edges
- Background details
Step 5: Download the enhanced image
If the result looks natural, download it.
The limitation
Krea’s enhancer is powerful, but AI enhancement is still an interpretation of the original image. A heavily blurred photograph may not suddenly become a perfectly detailed original photograph.
That is true of every AI enhancer.
The software can reconstruct plausible detail. It cannot always recover information that was never captured.
2. Upscale.media: Best for quick image upscaling without registration
If your priority is speed, Upscale.media is one of the simplest options available.
The platform focuses heavily on removing friction from the process. Upload an image, allow the AI to process it and download the result.
Upscale.media states that users can access its photo enhancement tools without signing up for initial use. Its tools are designed to improve sharpness, refine details and enlarge images without requiring manual editing skills.
What Upscale.media is best for
- Low-resolution images
- Quick social media improvements
- Product photographs
- Enlarging smaller images
- Users who want a one-click workflow
Why it works well for beginners
Some image editors give users a large number of controls before they can do anything useful.
That can be valuable for professionals. It is unnecessary for someone who simply wants to make a compressed image clearer.
Upscale.media takes the opposite approach.
The tool is designed around a largely automatic workflow. There are no complicated editing panels to learn before processing an image. The platform also provides before-and-after comparison functionality on its enhancement pages.
How to use Upscale.media
Step 1: Open the image enhancer
Visit the photo enhancement or image upscaling tool.
Step 2: Upload the original image
Use the highest-quality version you have available.
This is important. AI enhancement works better when the original file contains useful visual information.
Step 3: Let the AI process the image
The tool automatically attempts to improve resolution and clarity.
Step 4: Review the before-and-after result
Do not immediately download the enhanced version.
Zoom into the image first.
Check whether:
- Facial features still look natural
- Text remains readable
- Edges are not oversharpened
- Fine textures have not become artificial
Step 5: Download the result
If the improvement looks genuine, save the enhanced version.
The limitation
Upscale.media is designed for convenience rather than deep creative control.
That is a strength for quick jobs, but advanced users may eventually want more control over how an image is processed.
3. Cutout.Pro: Best for people who need more than image enhancement
Cutout.Pro is worth considering because image enhancement is only one part of its broader AI image toolkit.
The platform offers an AI image enhancer and upscaler designed to make photos sharper, cleaner and higher in resolution with a relatively simple workflow. Its enhancement page allows users to begin by uploading an image directly.
That broader ecosystem can be useful.
Imagine that you are preparing a product image for an online store.
You may want to:
- Remove the background.
- Improve the image quality.
- Increase the resolution.
- Make the final image cleaner for a marketplace listing.
Using separate tools for every step can become tedious. A platform with several AI image utilities can make that workflow easier.
What Cutout.Pro is best for
- General image enhancement
- Product photography
- Online listings
- Background-related editing
- Quick browser-based AI tools
Why it stands out
Cutout.Pro makes sense for users who do not want a tool dedicated to only one task.
Its image enhancer can improve clarity and resolution, while the broader platform includes other image-processing utilities. That makes it more flexible than a simple standalone upscaler.
How to use Cutout.Pro’s image enhancer
Step 1: Open the AI Image Enhancer
Go to the Cutout.Pro enhancement page.
Step 2: Upload or paste an image
The tool provides options to upload an image and also supports image input through its interface.
Step 3: Process the image
Allow the AI enhancer to generate an improved version.
Step 4: Examine important details
Pay particular attention to:
- Faces
- Fine objects
- Product labels
- Text
- Hair
- Architectural edges
Step 5: Download the preferred result
Choose the version that improves the original without introducing obvious artificial details.
The limitation
The broader range of tools can be useful, but users who want the most advanced professional control over denoising and image reconstruction may prefer specialised desktop software.
4. PicWish: Best for everyday photos and practical image cleanup
PicWish has become a practical option for users who want straightforward AI image editing without learning professional software.
Its photo enhancer is designed to improve clarity, restore detail and balance lighting automatically. PicWish also offers a dedicated image upscaler for enlarging portraits, product images and AI artwork.
That combination makes PicWish useful for everyday image problems.
You might have a portrait that looks slightly soft.
Or a product image downloaded from an old website.
Or an AI-generated picture that looks good at a small size but needs more resolution for printing.
These are the kinds of situations where an automatic enhancer is more useful than a full editing application.
What PicWish is best for
- Portraits
- Product photos
- Everyday photography
- AI-generated artwork
- General image upscaling
Why it stands out
PicWish does not try to turn image enhancement into a complicated technical process.
Its tools are built around common practical needs, including photo enhancement and image upscaling. The platform also offers broader editing workflows for users who need more than one adjustment.
How to use PicWish
Step 1: Open the PicWish Photo Enhancer or Image Upscaler
Choose the tool based on the problem you are trying to solve.
Use the enhancer if the image generally looks dull or unclear.
Use the upscaler if resolution is the main issue.
Step 2: Upload the image
Select the best original file available.
Step 3: Allow the AI to process it
The tool analyses the image and generates an enhanced version.
Step 4: Compare the result
Look for genuine improvements rather than simply accepting a sharper-looking image.
Sharpening alone can sometimes create halos around objects.
Step 5: Download the image
Save the version that looks closest to a natural improvement.
The limitation
Free access and usage allowances can change over time, particularly for cloud-based AI processing. If you plan to process many images, check the current limits before relying on PicWish for a larger workflow.
5. Picsart: Best for creators who want enhancement and editing in one place
Picsart approaches image enhancement differently from the simple upload-and-download tools above.
It is a broader creative platform.
That means the image enhancer can be part of a larger editing workflow rather than the final step.
After improving an image, users can continue editing, adding filters, changing backgrounds, creating social media graphics or preparing content for other platforms.
Picsart says its AI Enhance tool is designed to sharpen details, address blur and balance colours. Its official instructions describe the feature as available through the mobile app and web editor.
What Picsart is best for
- Social media creators
- Content creators
- Images that need enhancement plus additional editing
- Creative projects
- Mobile editing workflows
How to use AI Enhance in Picsart
According to Picsart’s current help documentation:
Step 1: Open the Picsart app or web editor.
Step 2: Upload the image you want to improve.
Step 3: Select the AI Enhance option.
Step 4: Allow the tool to process the image.
Step 5: Apply the enhancement and save the result.
The important limitation
This is where convenience becomes different from the no-signup tools.
Picsart’s official help centre currently states that AI Enhance is a premium feature and that applying the enhancement and saving the high-resolution result requires an active subscription.
That does not make Picsart a bad choice.
It simply means it is less suitable for someone who wants to improve one image immediately without registration or payment.
Which image enhancer should you choose?
The answer depends on what is actually wrong with your image.
| Your problem | Best type of tool |
|---|---|
| I want a quick enhancement with no signup | Krea |
| I need fast upscaling | Upscale.media |
| I want enhancement plus other AI tools | Cutout.Pro |
| I need practical photo and product image improvement | PicWish |
| I want enhancement inside a full editing platform | Picsart |
This distinction is more useful than simply declaring one tool the winner.
An image enhancer is not a single category of problem.
A blurry portrait, a tiny product image and a compressed social media photo may all need different treatment.
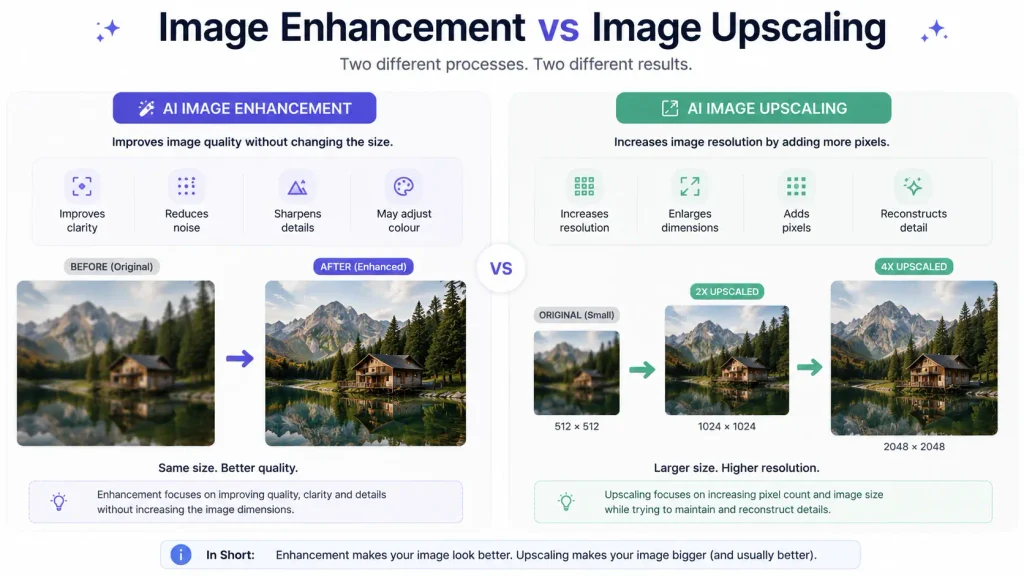
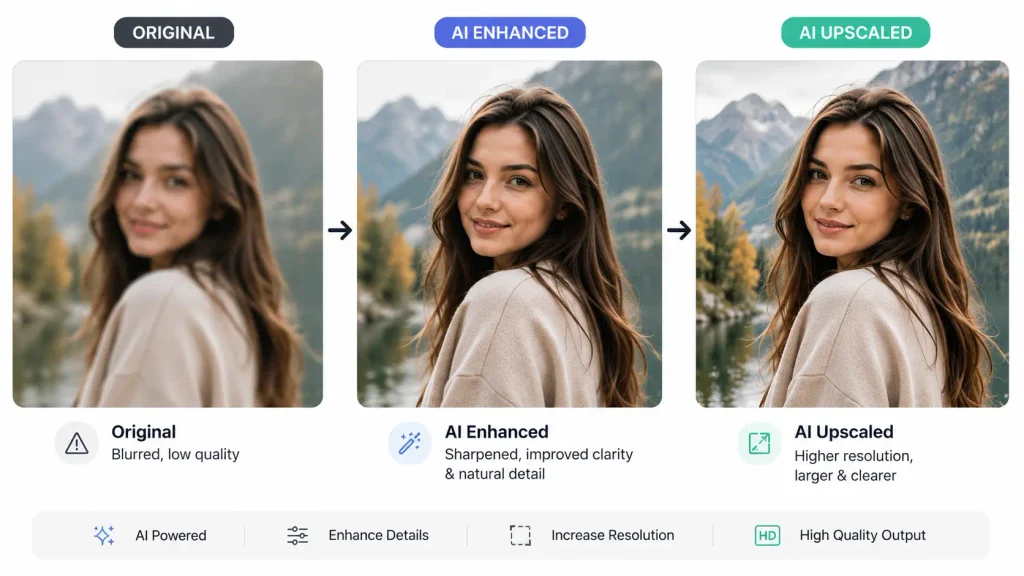
Image enhancement and image upscaling are not exactly the same thing
The two terms are often used interchangeably.
They should not be.
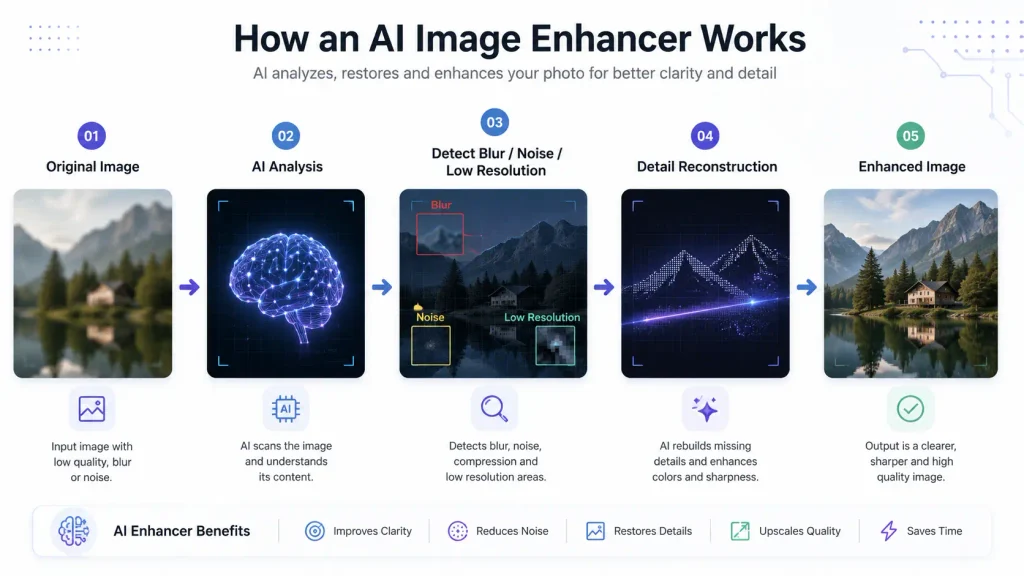
Image upscaling
Upscaling primarily increases the dimensions of an image.
For example:
A 500 × 500-pixel image might be enlarged to a larger resolution.
Traditional enlargement often made images look soft because the computer had to stretch existing pixels.
AI upscaling attempts something more sophisticated. The system analyses the image and predicts additional detail that can make the larger version look more convincing.
Image enhancement
Enhancement is broader.
It may involve:
- Sharpening
- Noise reduction
- Contrast improvement
- Colour adjustment
- Detail reconstruction
- Blur reduction
- Resolution improvement
A good enhancer may use some of these techniques together.
That distinction matters when choosing a tool.
If your image is already sharp but simply too small, an upscaler may be enough.
If the image is dull, noisy and slightly blurry, you may need broader enhancement.
How to enhance an image step by step
The exact buttons will change from one tool to another, but the general process is similar.
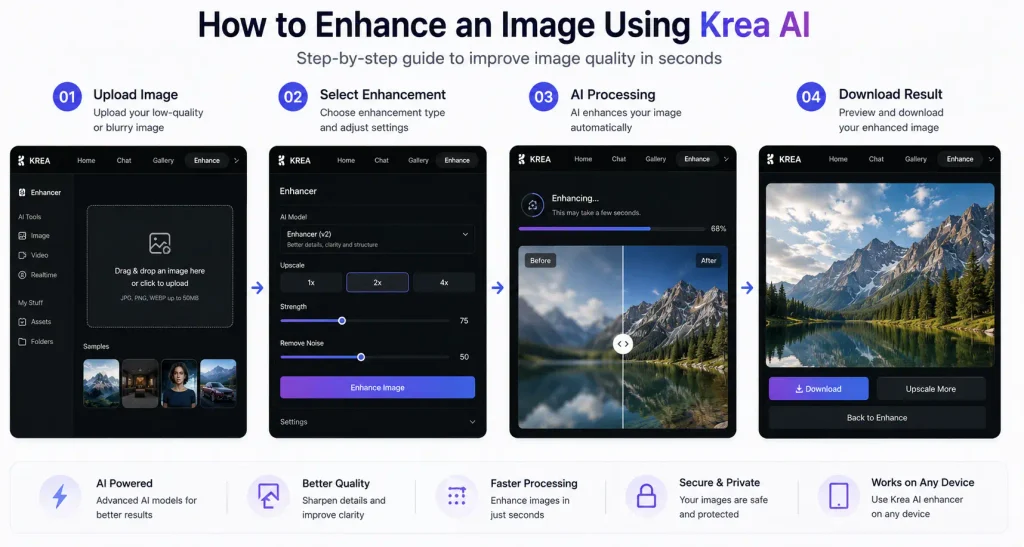
Step 1: Start with the best original image you can find
This sounds obvious, but it is one of the most important parts of the process.
If you have three versions of the same photograph, use the largest and least-compressed one.
Do not download a compressed social media image if the original camera file is available.
AI enhancement works with the information it receives.
A better starting point usually produces a better result.
Step 2: Decide what problem you are fixing
Ask yourself:
- Is the image blurry?
- Is it too small?
- Is it noisy?
- Does it lack detail?
- Is the lighting poor?
- Does the image simply need to look cleaner?
This determines whether you need an enhancer, an upscaler or a more complete editing tool.
Step 3: Upload the image
Open the chosen tool and upload your file.
If the platform supports several processing options, avoid automatically selecting the strongest setting.
More enhancement is not always better.
Step 4: Generate the enhanced version
Allow the AI to process the image.
Most modern online tools complete the task in seconds, although larger files and higher-resolution processing can take longer.
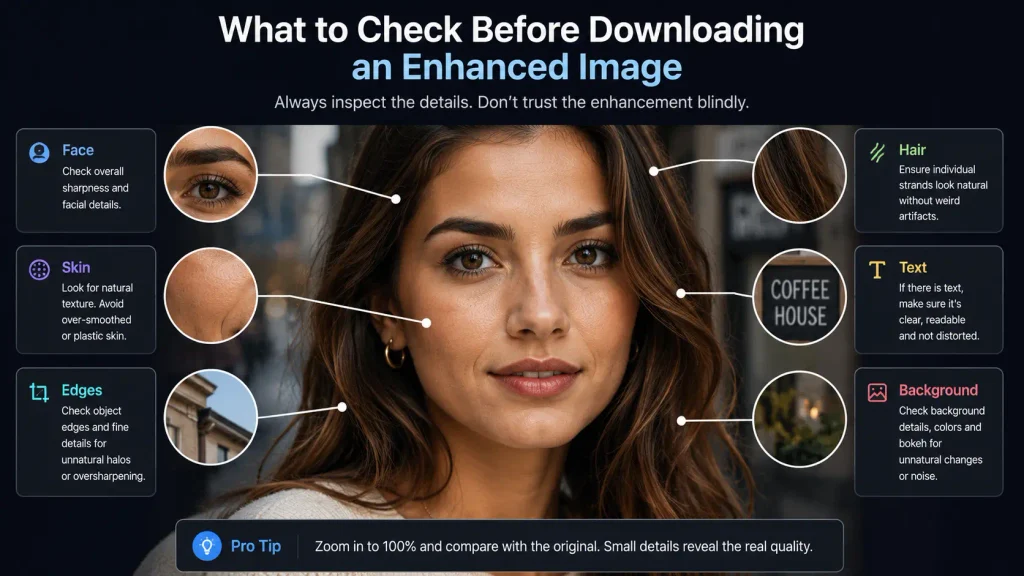
Step 5: Compare before and after
This step is frequently ignored.
Do not judge the result only by looking at the whole image.
Zoom in.
Check:
Faces
Does the person still look like themselves?
Hair
Has the AI created unnatural strands or repetitive patterns?
Text
Has small writing become clearer, or has the AI distorted it?
Edges
Are objects sharper, or do they have artificial halos around them?
Skin
Does the skin still have natural texture?
Background
Did the enhancement create strange patterns where the original image was blurry?
A technically sharper image is not automatically a better image.
Step 6: Download the result in the right format
For general web use, JPEG and WebP can provide smaller file sizes.
For graphics, transparent images or situations where maximum image fidelity matters, PNG may be preferable.
Choose the format based on where the image will be used next.
The biggest mistake: assuming AI can recover anything
AI image enhancement can be impressive.
It also has limits.
This is particularly important with severely blurred photographs.
Suppose a face in the original image contains almost no visible detail.
An AI system may generate plausible eyes, skin texture and facial edges.
But “plausible” is not the same as “historically accurate.”
The system is making an informed reconstruction.
That means enhancement can sometimes introduce details that were not actually present in the original image.
For casual social media use, this may not matter.
For evidence, archival work, historical photographs or forensic purposes, it can matter a great deal.
The best way to think about AI enhancement is not as a magical recovery process.
Think of it as an intelligent reconstruction and improvement process.
Sometimes the reconstruction is extremely convincing.
Sometimes it is wrong.
When AI image enhancement can make a photo worse
A stronger AI model does not guarantee a better result.
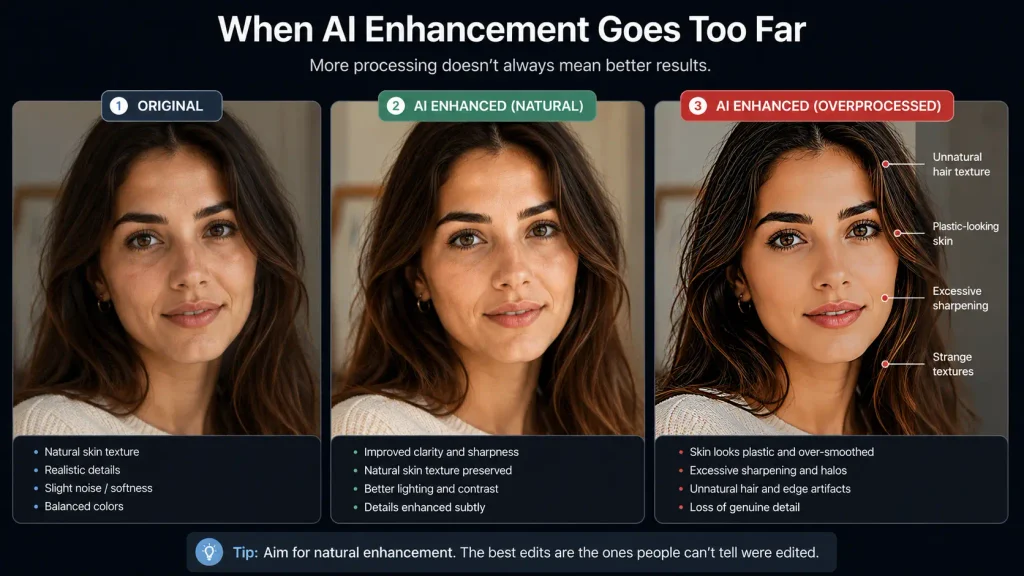
Problems can appear when the tool attempts to improve an image too aggressively.
Oversharpening
Edges can become unnaturally harsh.
Artificial skin
Portrait enhancement may remove too much natural texture.
Invented details
The AI may create patterns that look believable but were not present in the original.
Strange hair
Hair is particularly difficult because it contains many thin, overlapping details.
Distorted text
AI can improve some text, but it may also alter letters.
Excessive contrast
An image may technically look clearer while losing the subtle tones that made the original photograph feel natural.
This is why comparing before and after is essential.
The best result is often not the most dramatic result.
It is the version that improves the image while preserving what made the original believable.
How to get better results from any image enhancer
A few practical habits can make a noticeable difference.
Avoid screenshots when the original file exists
Screenshots often introduce additional compression.
Use the source image whenever possible.
Do not enhance the same image repeatedly
Running an AI-enhanced image through multiple enhancers can gradually create artificial textures.
One careful enhancement is often better than three aggressive ones.
Use moderate settings first
If the tool offers several levels of enhancement, begin conservatively.
You can always try a stronger version later.
Keep the original
Never replace your original image permanently.
Save the enhanced version as a separate file.
Match the tool to the image
A portrait enhancer is not always the best choice for a product photograph.
An AI art upscaler may not be ideal for historical family photos.
The type of image matters.
Are free image enhancers good enough?
For many everyday tasks, yes.
If you need to:
- Improve a social media image
- Make a small photo larger
- Clean up a product image
- Sharpen an AI-generated image
- Prepare an image for a presentation
A browser-based AI enhancer may be enough.
Professional photographers and designers, however, may eventually need more control over noise reduction, sharpening and image reconstruction.
That is where advanced desktop software becomes useful.
The difference is not simply about quality.
It is about control.
A one-click online enhancer makes most of the decisions automatically.
Professional software gives the user more responsibility—and more flexibility.
Frequently Asked Questions
What is the best image enhancer tool?
For users who want a quick online option without creating an account, Krea is one of the strongest choices because its dedicated enhancer can be used without signup for basic access. Upscale.media is another convenient option for simple enhancement and upscaling.
Which image enhancer does not require signup?
Krea explicitly states that users can access its AI photo enhancer without creating an account. Upscale.media also describes its basic enhancement workflow as accessible without signup for initial use.
Can AI improve a blurry photo?
AI can often improve the apparent clarity of a blurry image by analysing existing information and reconstructing likely detail. Results depend heavily on how much useful information remains in the original photograph.
- A slightly blurry image can often improve significantly.
- A severely blurred image may still remain limited.
Does image enhancement increase resolution?
It can.
Many AI enhancers combine image enhancement with upscaling. The system can increase pixel dimensions while also attempting to reconstruct details and improve clarity.
Is image enhancement the same as upscaling?
Not exactly.
Upscaling focuses mainly on increasing image dimensions and resolution.
Image enhancement is broader and can include sharpening, noise reduction, colour adjustment and detail improvement.
Can AI image enhancers make photos look fake?
Yes.
Overprocessing can create artificial skin, unrealistic hair, strange textures and invented details. Always compare the enhanced version with the original.
What is the best image enhancer for social media?
For quick improvements, Krea, PicWish and Upscale.media are useful starting points. For creators who also want filters, design tools and additional editing features, Picsart offers a broader creative workflow.
Should I enhance an image before posting it online?
If the original is blurry, compressed or too small, enhancement can help.
But avoid excessive processing.
Social platforms often apply additional compression, so an overly sharpened image can sometimes look worse after upload.
The best image enhancer is the one that solves the actual problem
There is a tendency to search for a single winner in software comparisons.
But image enhancement is more complicated than that.
Someone trying to rescue an old family photograph has different needs from a seller preparing product images. A content creator improving an Instagram photo has different priorities from a designer enlarging artwork for print.
That is why the simplest answer is also the most useful.
If you want to enhance an image quickly without creating an account, start with Krea or Upscale.media.
If you want image enhancement as part of a wider AI toolkit, Cutout.Pro is worth exploring.
If you need a practical all-around tool for everyday photos and image cleanup, PicWish is a strong option.
And if your image is part of a larger social media editing project, Picsart may make more sense despite the additional account and premium limitations around AI Enhance.
The technology behind these tools will continue to improve. But the basic principle is unlikely to change: the best enhancement is usually the one you barely notice.
A sharper image is useful.
A sharper image that still looks like the original is better.